The heat travels from the lower unit to the upper on the right and left side. So my thought is this might help even things out. We'll see..
This is the view from above where the stone sits.. the tabs on the left and right that point upward are where the heat channels are along those sides (hard to see in these pics). The tabs also center and hold the lid.
The upper and lower sections are welded together. It would be nice if they were separate as then you can put something in there to direct heat. Hence my diffuser design to insert into the fitting from under.
LOL. I should! I'll be happy with some evenly cooked pizza . Maybe I can get the wife to go with something tomorrow and run a real test but I also have a pork shoulder/butt going on late for Saturday.
Wow! I never suspected you could achieve 1K degrees in a pellet grill. I guess my next question is will the grill stand the additional heat created as a result of the deflector? Do these things get that hot in the fire pot in their original configuration?
Wow! I never suspected you could achieve 1K degrees in a pellet grill. I guess my next question is will the grill stand the additional heat created as a result of the deflector? Do these things get that hot in the fire pot in their original configuration?
I can say things were getting hot.. I did see a bit of smoke coming from the hopper and when I brought things back down there was a little burn back in the auger. When the final auger dropped the pellets it was limited to that but did smolder in the pot for a bit.
I don't plan running it full bore all the time like this. I was trying to see if I can melt anything before I put food over it
I made a diffuser out of stainless to hopefully prevent too much heat on the bottom and burning the bottom.. no idea how it will work just cut it out and tested it to make sure it didn't melt LOL. It was a quick one and not perfect but think it will do the job. The flames otherwise would lick the bottom pan directly I think.
That's really creative. Have you used the oven and found that the top of the pizza did not cook enough for your taste? I think some larger openings to the left and right of the diffuser may help since most of the heat ends up in the back so if the sides were hotter, it may cook more evenly
Now if you can do a with and without diffuser to determine if it provides the desired results
Since the back gets the hottest, I found spinning the pizza 1/3 of a rotation every 1-2 minutes for 3 rotations cooked top without burning the bottom.
I have not cooked on it yet and just going on some other threads where others had issues. I was actually going to create more openings initially but figured this way I can try as is and modify if I found it necessary.
Yours do look great.. I like crispy toppings so I’ll be happy if mine come out like that .
We’ll see and I will update once I get the pizzas done!
The instructions with the GMG pizza attachment say that because of the high heat welding gloves are needed to remove the top...silicone or regular gloves aren't suitable. I made a handle by drilling a 11/32 hole in some scrap wood. It just slides over the metal handle on the top when I need to remove it. Keep it at an upward angle so the top doesn't slide off until it's in a safe place then slide it back off.
The instructions with the GMG pizza attachment say that because of the high heat welding gloves are needed to remove the top...silicone or regular gloves aren't suitable. I made a handle by drilling a 11/32 hole in some scrap wood. It just slides over the metal handle on the top when I need to remove it. Keep it at an upward angle so the top doesn't slide off until it's in a safe place then slide it back off.
Now that's a handle (Crocodile Dundee)
Curious why you need to remove the lid while it's still hot?
I never felt the need to remove the lid until it cools off...
Well if there's a way to screw something up I'll probably find it. I made the handle before my first cook and after reading how hot the top could get. I didn't have welding gloves so i didn't want to have to get my hands near the hot top. On my first cook the pizza my wife made was a little large. When I put it in some of the dough fell over the back edge of the stone where it cooked quicker, hardening up and forming a hook on the stone. When I attempted to turn the pizza it started tearing since the hooked part wouldn't move. Removing the top allowed me to rescue it easier. The pizza didn't look too good but tasted great. I also envision possibly wanting to remove the top to clean off the stone if something spills while cooking multiple pizzas. It's one of those things I hope to never use but can't do without if needed.
Well if there's a way to screw something up I'll probably find it. I made the handle before my first cook and after reading how hot the top could get. I didn't have welding gloves so i didn't want to have to get my hands near the hot top. On my first cook the pizza my wife made was a little large. When I put it in some of the dough fell over the back edge of the stone where it cooked quicker, hardening up and forming a hook on the stone. When I attempted to turn the pizza it started tearing since the hooked part wouldn't move. Removing the top allowed me to rescue it easier. The pizza didn't look too good but tasted great. I also envision possibly wanting to remove the top to clean off the stone if something spills while cooking multiple pizzas. It's one of those things I hope to never use but can't do without if needed.
This thing is AMAZING!! I purchased it and did not have to bend the sides (no mods), as it fits right into the hopper. When I turned the grill on, I had her on full power, but that was too high. I'm still playing with the temperatures, but I just made 6 pizzas on this puppy within 25 minutes and loved every bit of it.
GMG still has a 20% sale until the end of the month!! Be sure to open the box before you leave to check if the baking stone is not cracked... the lady at the store I bought it from said they had some shipping issues and some were coming back cracked.
So I finally got a chance to use mine.. cheated a bit with pre-made Digiorno pizzas but OMG I’m loving this thing. Could not have come out any better for my taste. All I can say is it is very different than cooking in a oven.
Came out fluffier and crunchy in just the right spots with the right amount of crispiness. We both loved it. Bride said this is the only way we will cook pizza from now on. It might look a little burnt but this is how we like it and did not have any hint of a burnt flavor. Just crispy how we like it.
I'm about to pull the trigger on the link that @pungo listed. That is the pizza oven for the 700/1250, correct? Also, how large of a pizza can you make in it?
")
 . Maybe I can get the wife to go with something tomorrow and run a real test but I also have a pork shoulder/butt going on late for Saturday.


 I made the handle before my first cook and after reading how hot the top could get. I didn't have welding gloves so i didn't want to have to get my hands near the hot top. On my first cook the pizza my wife made was a little large. When I put it in some of the dough fell over the back edge of the stone where it cooked quicker, hardening up and forming a hook on the stone. When I attempted to turn the pizza it started tearing since the hooked part wouldn't move. Removing the top allowed me to rescue it easier. The pizza didn't look too good but tasted great. I also envision possibly wanting to remove the top to clean off the stone if something spills while cooking multiple pizzas. It's one of those things I hope to never use but can't do without if needed.
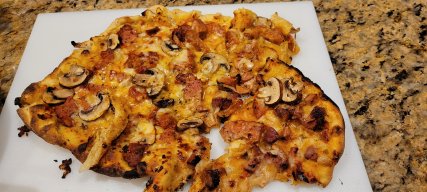

 .
.