ARCbbq
Well-known member
- Messages
- 81
- Grill(s) owned
- Stampede
(I posted some of this in an answer to an earlier discussion)
RT590 SHELF MODIFICATION OR ADDING A SHELF
PROBLEM
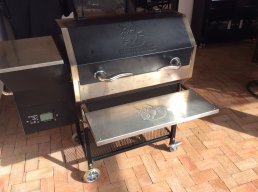
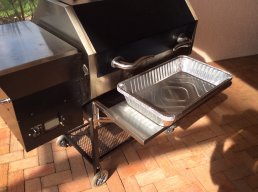
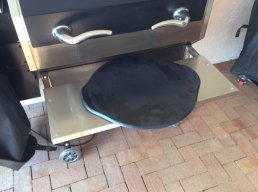
The current RecTeq shelf for the 590 Stampede is somewhat narrow (10 inches) and the included brackets position the shelf next to the grill. This location reduces the useful width to around 8 inches. In addition, the lid handles protrude over the shelf which further reduce accessibility. Lowering the shelf requires either pushing in the spring-loaded pins and/or flexing the brackets to disengage the pins. Either of these actions is awkward. When the shelf is in the lowered position the brackets protrude out which could potentially poke holes in a cover over time.
SOLUTION
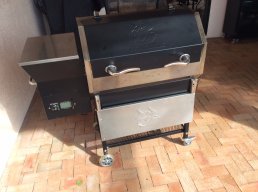
Since the shelf is stainless steel (and I already had it), I wanted to continue to use it, but relocate it away from the grill for better accessibility. This requires replacing the brackets with brackets that have longer horizontal arms. Other bracket requirements are stainless steel construction and an easy-to-use disengagement mechanism for lowering. I also wanted to use the current bolts in the front legs for attaching the bracket and not make any changes to the grill.
If someone doesn’t have the current RT shelf, then other materials could be used. If they are combustible (wood), positioning the shelf away from the grill is even more important.
DISCUSSION
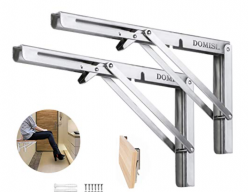
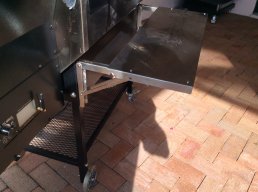
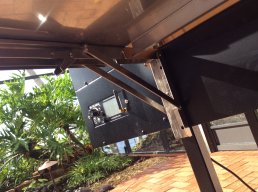
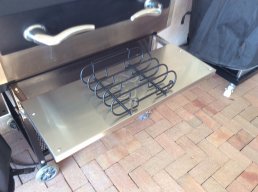
Stainless steel rackets with 14 inch arms were purchased from Amazon ($28). This allows the current RT shelf to be located 4 inches away from the grill. The spring pin mechanism (on the underside of the shelf) spot welds were cut away using a thin sharp chisel. Notches were cut in the flange at the rear corners to allow the shelf to sit directly on the bracket arms. Also a small section was cut on the left and right rear corners on the flange to clean the bracket mechanism when lowered. Shelf was drilled for 4 bolt holes to match existing holes in the bracket arm. An existing hole in the bracket vertical arm was enlarged to accommodate the current RT leg bolt. No modifications were made to the grill.
If I had not already purchased the RT shelf, I would have probably used wood & waterproofed it. Then the total cost would have been much less. I might have purchased 16 inch brackets, but still located the shelf 3 to 4 inches from the grill. In my opinion the RT shelf is overpriced for the utility it provides. Perhaps simply offering brackets for the DIY owners would be one solution, and separately offering a SS shelf to fit. They may be worried about liability if someone put a wood shelf on their brackets & it caught fire. There are many other bracket choices on the internet as well, so it is fairly easy to find something. Other competitors either include a shelf or offer something less expensive.
Pictures -
RT590 SHELF MODIFICATION OR ADDING A SHELF
PROBLEM
The current RecTeq shelf for the 590 Stampede is somewhat narrow (10 inches) and the included brackets position the shelf next to the grill. This location reduces the useful width to around 8 inches. In addition, the lid handles protrude over the shelf which further reduce accessibility. Lowering the shelf requires either pushing in the spring-loaded pins and/or flexing the brackets to disengage the pins. Either of these actions is awkward. When the shelf is in the lowered position the brackets protrude out which could potentially poke holes in a cover over time.
SOLUTION
Since the shelf is stainless steel (and I already had it), I wanted to continue to use it, but relocate it away from the grill for better accessibility. This requires replacing the brackets with brackets that have longer horizontal arms. Other bracket requirements are stainless steel construction and an easy-to-use disengagement mechanism for lowering. I also wanted to use the current bolts in the front legs for attaching the bracket and not make any changes to the grill.
If someone doesn’t have the current RT shelf, then other materials could be used. If they are combustible (wood), positioning the shelf away from the grill is even more important.
DISCUSSION
Stainless steel rackets with 14 inch arms were purchased from Amazon ($28). This allows the current RT shelf to be located 4 inches away from the grill. The spring pin mechanism (on the underside of the shelf) spot welds were cut away using a thin sharp chisel. Notches were cut in the flange at the rear corners to allow the shelf to sit directly on the bracket arms. Also a small section was cut on the left and right rear corners on the flange to clean the bracket mechanism when lowered. Shelf was drilled for 4 bolt holes to match existing holes in the bracket arm. An existing hole in the bracket vertical arm was enlarged to accommodate the current RT leg bolt. No modifications were made to the grill.
If I had not already purchased the RT shelf, I would have probably used wood & waterproofed it. Then the total cost would have been much less. I might have purchased 16 inch brackets, but still located the shelf 3 to 4 inches from the grill. In my opinion the RT shelf is overpriced for the utility it provides. Perhaps simply offering brackets for the DIY owners would be one solution, and separately offering a SS shelf to fit. They may be worried about liability if someone put a wood shelf on their brackets & it caught fire. There are many other bracket choices on the internet as well, so it is fairly easy to find something. Other competitors either include a shelf or offer something less expensive.
Pictures -